Wednesday, April 16, 2014

Sew Fun!

I'd forgotten how long it has been since I sat at my sewing machine. After an inspiring visit with my creative mentors and former neighbors, I found myself with some lovely upholstery fabric samples:


Each one is ~25" square! It is not enough for many patterns but since there are groups of coordinating samples, they are begging to be a patchwork... something.

I found many patterns on the web but this bag intrigued me most: (http://www.heirloomcreations.net/archives/free-schlep-bag-pattern/)

Here's my finished bag made from 3 samples:


This was a very difficult fabric to work with. I think if I had bound all of the edges of each piece first it might have helped. This was a particularly loose weave. I knew it would be difficult but wanted to use it as my test bag because I REALLY liked the other set of 3 samples I have and wanted the more refined bag to be made from them.


It was also difficult to line up the patchwork squares when sewing them together. They seemed to shift so the top piece always ended up longer. I'm not sure how to deal with that. Maybe more pinning although that didn't seem to help much. I wonder if there is a special foot I should use on the machine?
 I found myself reluctant to rip any more seams than I had to because the fabric ravelled so badly, so I left them as is.
Another issue is that the fabric snags very easily. I can't imagine using it on furniture.


Regardless of the difficulties, I love the results! It has a very cozy feel to it.

I'm planning to try to use the scraps to make some accessories:
Cup Sleeve: http://craftystaci.com/2011/01/10/reversible-coffee-cup-sleeves/
Business Card Holder: http://craftycupboard.net/how-to-business-card-holder/
     and/or:
  http://tamdoll.blogspot.com/2008/03/business-card-holder-tutorial.html

I even found this cute rooster pattern:
http://www.redtedart.com/2012/02/10/pyramid-juggling-bag-chickens/
I saw these made as door stops and juggling bags, as well as pin cushions. In fact the first time I saw this is was from the same folks who gave me the fabric samples!

When I get any of these done I'll either add them to this post or include them in a future post.

Some technical details of constructing the bag:
- There is a paper edging glued all around each sample.

Removing this took a careful iron. These samples were 70% rayon and 30% polyester so they weren't too sensitive to the heat. I also used a towel on top. Perhaps I was too cautious but the remaining samples I have are 100% polyester so I'll have to be as careful there as I was the first time. Sometimes it seemed to come off more easily in one direction rather than the other.


- The pattern called for 'fat quarters'. I had 3 swatches 25" square. Here's my calculations to determine how many samples it would take out of particular sizes of squares:


I figured out that 3 samples would make a bag with 6" squares. The original bag had 7" squares.

- Another challenge was that the original pattern used 8 fat quarters, potentially 8 different fabrics, and I only had 3. I decided to make the triangle pieces(body and lining) and the handles out of one sample(nice as the handles attach to these triangle pieces) and then use the other two samples to make the 24 squares I needed(12 for the body and 12 for the lining). I could get as many as 36 of the 6" squares but I only need 24 for the bag, so I'll have a spare 6"x25" strip from each sample to use for accessories,  as well as a small piece of the third sample which I used for a pocket inside.
I also figured out that if I used 4 squares of the same fabric for the bottom of the body and 4 squares of the other fabric for the lining bottom, it was the only way to get the patchwork of the rest of the body to work 'correctly' (none of the same fabric next to itself), and this makes the lining not quite match the body, but since the triangles inside and out are the same it isn't noticeable.

- In retrospect, I think it makes sense to make the bottom 4 squares be all one piece. I think I'll try that next time.

- The pattern called for a lining made of 'batting'. I had old quilt batting scraps but I think something like an iron-on interfacing might have been a better choice. It would have helped with the ravelling and made for a 'crisper' feel. I think I want this for the next version. I think the accessories will benefit from this as well so before I make them I'm going to get some.

- A final detail, I think I should have top stitched all of the seams as they do not want to iron flat. If the next fabrics are like that (they are very different than the first ones, tightly woven and thinner, although of a similar color) I'll try it.

At this rate I'll be headed back to my friends for more samples! I feel a little silly for being so instantly attracted to this and distracted from what I've been doing(polymer clay), but I'm thinking of making a decorative button out of clay for the bag so it is all part of the creative process.... I know one thing, the longer I work in this room the more I want to be here! :)


Wednesday, April 9, 2014

More clay projects

As I've been working I've done more than I've shown.... here are some other things I've made in the first two weeks of working with polymer clay:

Translucent clay with gold leaf on the left(salt?) and green glitter in translucent clay on the right(pepper?):


This stemmed votive was covered in silver clay then textured. After baking I applied acrylic paint and flatback crystals. It needs a smaller candle without the metal cup:


 This  small dish is covered in a checkerboard cane:


 These are supposed to be Marshmallow Peeps. My husband says they look just like them. I got this idea from a Polymer Clay TV video. Kira made the little bunny Peeps and I think I know why as it was difficult to form the Peep shape in the clay. These were my first tries. I'll be making more:


 These pink buttons look much better now that they have been painted with ink to bring out the pattern:


 Here are a bunch of miscellaneous pieces. From the upper left corner going around: a future pendant, left over from a project I haven't taken a picture of yet; then some tubular purple beads. One looks like a crayon wrapper; a flat heart, two nice pink beads I'm going to try to polish; a translucent disk with a silver band; 4 purple and black beads, an odd silver pendant... needs a backing I think:


A translucent disk with home-made beach glass embedded.The glass was from a green wine bottle and had many thin slivers. Just a thin layer of clay on top:

More as it happens.

Creative frenzy... and mundane details

One week and one day ago in my last post I had made some earrings out of electronic components, resistors. I ended up with 37 pair(including a pair for myself) and they were a huge hit at the party! Everyone loved them.
I've made 5 more pair, for a few stragglers that didn't get a pair.

And the creativity has been flowing, in between a brake job on my car, and a broken water heater....

Here's a nice shot of the votive candle from my last post with a light inside:


 It came out nicely. The dark area at the bottom is because the votive candle is in a metal cup. Kind of annoying. But it does make the old candle easy to remove.


Today(well, yesterday now) I went out and bought some more colors of clay. I had to get Sculpy III for blue as Michael's had nothing firmer. I also got some Fimo soft, red and yellow as the only Fimo classic colors they had were black and white and I have some Kato coming in on Thursday in those colors. I ended up mixing in some of that super-stiff Kato pearl and it helped a little.

I wanted to try something like a rainbow. I found a new way to make a Skinner-like blend, using tear drops on Cindy Lietz's 'Polymer Clay Tutor' on YouTube:
https://www.youtube.com/watch?v=nLAfFTcfSA8

 It was easier to make the tear drops than the triangles. Here they are squished down a little:


 And they blended up nicely:


I made the blend into a rainbow spiral:


It sliced up nicely also:


I flattened each slice on setting 6:


And applied them to this little Ball jar mug:


 Here's the finished product, lit and unlit.
 Not bad, and way outside of my usual color palette.


With the leftover piece of cane, I decided to try the 'Reason to Friesen Challenge' over at Polymer Clay Adventure (http://polymerclayadventure.com/reasontofriesen/) monthly project. It is a funky pod. First I took that rainbow cane and reduced it and made it into a flower(cut into 7 pieces, one in the middle, six around it).... then did that again(reduce, cut,  flower). Has a butterfly wing effect which is so cool! I took slices of it and covered a pod shaped lump of clay:


Then I took Kira's lead and made some cute little cups:


 Pre-baked them then attached them to the pod with head pins and beads.
 And here's the little beast, looking pretty cute:

This was my first 3-D object from clay. Also the first time I baked some bits first to stick onto something later. I sort of like it! I think I'll post it over on Polymer Clay Adventure, too. It is also worth noting that it turned out quite dark. I could have mixed in more translucent to lighten it. I believe this is a property of Sculpy III. I've been using Kato mostly and plan to continue.
The green section is almost invisible so I'm not sure the green cups were the right choice. Maybe yellow would have been better. The cap could have been a little more contrasting.
I also notice a fingerprint right in front.... but just looked up ways to eliminate it!
 These are critiques... since I'm just learning I want to get everything I can out of each 'lesson'.
I am amazed that after only 2 weeks I have so many finished items, and have learned so many different techniques. I've also found at least 3 communities of crafters... there are certainly dozens! Are there any larger groups of communities?

More projects in my next post....

Monday, March 31, 2014

polymer clay.... who knew?

If I'd known how much fun I'd have with polymer clay, I wouldn't have hesitated at all when I bought my first supplies, last week.
My inspiration was 'the button' (see post from earlier) and a video I saw on Beads Baubles and Jewels (of course I can't find it now) and then the true inspiration came when I saw this video:
http://blog.craftygoat.com/2008/01/video_how_to_make_button_molds.html
which was particularly good because it showed how to deal with the shank (embed a jump ring BEFORE de-molding). I wrote to Angela with a question about baking with a shank (in a bed of cornstarch which has worked well for me) and she wrote back with encouragement. I bought her book but it isn't here yet and I'm galloping along without it. Hope it arrives soon!

So in my earlier post you saw my first try, which didn't work well, and my second try which came out much better.
Here are some molds I've made with the original button and the resulting copies:

Notice how I used only the central part of the first one... and I put a hole in it to use as a pendent or charm.
I learned while teaching myself bead work that every piece is a lesson. I'm learning SO much. Also notice the copper color in the 'Cinderella coach' mold. this is from PearlEx powder. One site said to use it as a mold release. I didn't like this idea for a couple of reasons:
- the 'release' effect caused the button to come out of the mold before I was ready. I have not had a problem with clay sticking in these molds.
- all of the powder didn't come out and now it is hard to get out, but comes out on the buttons.
So I won't be trying that again.
Another way to apply the PearlEx is with a fingertip. My fingertips must be larger than average... I end up with the powder on parts of my finger that I can't angle properly to apply where I want. The powder seems to get everywhere.
When I put the powder in the mold I used a q-tip. I think I'll use that when applying the powder next time to see if that goes better.[Later: It did not go better! With a finger it goes only on the raised part. With a q-tip is gets between and causes a different effect. I keep getting it under my fingernail... I think I'm trying to go too fast. Patience!]

OK, now things get fun. I watched TONS of videos while waiting for my supplies. Mostly from PolymerClay TV:
http://polymerclayproductions.com/
Ilysa and Kira are great. Their videos are interesting and well done. They also vary quite a bit. Sometimes it is mixed media, other times it is very basic 'how to' stuff with clay. I have not found a place where I can just go through them in order. I found myself at YouTube and just sort of watching randomly. At first I wanted the basics and now I find myself going back to watching the more advanced ones again.
They have taught me so much and Ilysa even visited my blog. She probably doesn't have time to read all this but if so, Hi Ilysa!)

Two new terms I found:
- cane: these are 'logs' of clay, usually with a design embedded inside. Everything from a simple 'bullseye', to a spiral, to a kaleidoscope, and more is possible. I'm doing very basic things now but hope to learn more.

-  Skinner blend: Named for Judith Skinner, this clay sheet starts with two separate colors which are blended cleverly into one continuously varying sheet. I've tried making a few but somehow I do something wrong at the beginning most times and end up with something very long and skinny. A couple of times I've done it correctly and it is cool, but even when I mess up, I've been able to use the result anyway. This learning phase is fun! If I get something I didn't expect, I use it anyway. This is helping me see things differently and transform my attitude.

As I'm learning 'more is possible' is an often used phrase with polymer clay. Another great line is 'nothing is a mistake'. I think this may be 'my medium' :) And Ilysa says 'Have fun with it!'.... I am!

So, Ilysa's video about putting clay on glass got me excited on Saturday so I found a blue glass dish that was given to me (from the same friend who liked the 'Cinderella button', Hi Linda!) and tried covering it with clay:

It doesn't look like much, but parts of it are very nice. Notice the black spots on the top on the left... this was very close to the element in my toaster oven. I've since turned the shelf upside down to give a little more head room. I really like the copper color on the base with the texture. I actually made the color by mixing PearlEx powder into the clay. I wish I'd put a contrasting color of PearlEx on it... but I'll be making more like this so I'll do it on those. This was a test piece. I made a simple cane and cut slices off it but then ran out before the piece was covered. So I made another one, but they are very different. From another angle you can see the dark outline of the second cane better:


I was very pleased with this test. I liked the way the light shone though the translucent clay but the small dish made it difficult to see this.
I tried again using another dish from the blue set, this one is just a plate:
but wow!
It looks like slices of agate or something. I am just loving the way the texture is visible through the translucent clay. I put some translucent into each color. In part to alter the color but also I have a big block of translucent and not much of anything else.
In this piece, the color is all from the glass. the clay is shades of grey/silver.
I also stretched the slices of cane in the pasta machine. Different thickness when slicing produced different effects after stretching. Using a roller it was easier to keep the slices round.

I went out to the store and found a bunch of inexpensive glass to try covering. I also got some additional clay colors.

As soon as I got home I made this:
This was a clear glass globe and the clay was blue. This was taken in low light with a candle inside. Here it is with the lights on:


It still looks pretty good. That first dish doesn't look as good with the lights on.

After that I made another one:

This looks blue too but it actually purple with a lot of pearl(the stuff that won't condition by itself) mixed in. This piece is not baked yet but I just love how I made the spiral cane into a square... I just formed it that way... this stuff is amazing!
I don't like the diamond texture as much as the swirly texture on the other piece but I thought it would be good with the way the square spirals are arranged in a diamond pattern. I also smeared a lot of PearlEx on the texture to make it pop, but maybe too much. We'll see after baking. I think it might need a band at the top too.

So that's about all I've done so far. If I keep this up I'm going to need more clay soon.
I'm a little worried about ordering from Amazon again. Those big bricks are nice and the price is good but one of two bricks I ordered had a problem. I've read that quality can be a problem due to heat and storage in warehouses.

I went to the store Sunday and bought some 2oz Fimo clay blocks. Some of them say 'soft' on them. Mixing these with the 'bad' Pearl block makes a nice usable clay that works ok in canes. I didn't mention it earlier but until yesterday, all the clay I had was Kato.

Off to do a few chores and then more clay!

Who could resist?

In my earlier post, I mentioned a large purchase from Fire Mountain Gems which arrived last week. One of the items in it was a bag of electronic resistors!
<should show some resistors here>

First, I had fun sorting them. I bought them with the idea that I'd use them in jewelry. Serendipity in action, one of our lead engineers is retiring this week and I'm making as many pairs of resistor earrings as I can by the party.


So much fun! Now I just hope the others at the party think so too!

These are pretty geeky. For the true geek, here is a picture of the meaning of the color code (stripes) on the resistors.... I guess true geeks would already know the code.
I shamelessly stole this from a web site... and I don't even know which one.

Anyway, resistance is futile! I must go and make more....

The button that started it all

Remember this button?

I posted it to this blog months ago when I was first getting into vintage buttons.
A friend at worked saw it and loved it.... I actually found another one that didn't have nasty paint all over it.... and I gave it to her. I didn't know what I'd do with that one button and I had so many. But I loved it too. It looks like a Cinderella coach... but it is actually an early automobile.  It is plastic so I knew it wasn't valuable or antique. I looked for more info and found out in the 60's they made buttons like this for 'car coats'. Which was a short-ish coat, to be worn in a car... easier to get in and out of the car, I guess.
Anyway, while watching Beads Baubles and Jewels I saw a bit on using molding compound and polymer clay to make duplicate buttons.... Aha!
Of course, this meant getting 'into' polymer clay...... is it something I want to try? I seem to just go from technique to technique and never settle on anything.
But the button jewelry goes nicer when there is more than one of a particular button and I have a lot of nice, single buttons.... so I put the supplies in my 'cart' at Fire Mountain Gems and realizing I hadn't bought anything from them since last July I decided it would soon be worth splurging.
In parallel I was planning another month-long leave of absence from work. When that came through I decided to make the purchase.... after thinking about it for another weekend.
The 12 lb package arrived last Tuesday and I spent all evening and the next day sorting and repackaging it all... luckily there was a blizzard, and I spent the whole day with the supplies.
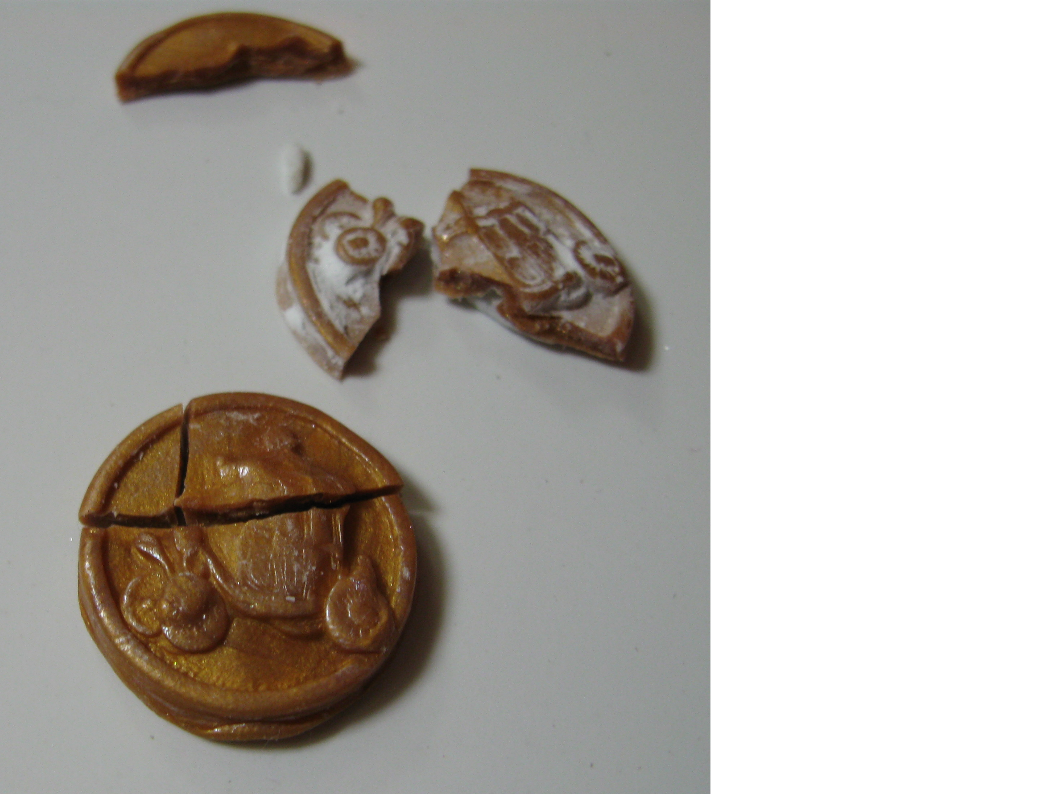
By the end of the day Wednesday, I had made a mold of the button above, and even tried filling it with a gold-ish colored clay. I'd mixed it with some of the 'concentrated colors' of Kato and some translucent Kato. I used a jump ring for the shank. I brushed the tops with some PearlEx and they looked very cute.
I looked up how to fire them with the shank and the design on the front and decided to  put them on a bed of baking soda.
I bought myself a small toaster oven and tried baking them.... 300 degrees for 10 minutes. They seemed hard so I took them out.
Later I wondered how strong they were and to my dismay, they broke easily! :(

Somewhat discouraged I did more reading and I believe I didn't cook them long enough. While 10 minutes is what it says on the package, when I read what people say about their own use they say 20 or 30 minutes.... as long as the temperature isn't too hot, the clay won't burn.
 Another problem may have been the concentrated color clay I mixed in.... too much concentrate? Not mixed in well enough? At any rate, I never expected to have them come out perfect the first time.

Undaunted, I pressed on. I made up more clay, silver this time*, and tried again with a longer bake time.
Here are the results:
Aren't they adorable? These are brushed with a blue/pink PearlEx. The one second from the left looks like it could use some sanding. I'll also admit, I haven't tried to break one of them.

* Silver - My big block of Pearl colored Kato is flawed. It won't condition. I tried adding some liquid clay to it (I only had black so I ended up with grey after mixing it into the pearl) and finally got it to behave a little better and used it for these buttons.

The original button was black w/ silver. I bought only a small block of black clay. I'll get to the black button copies soon.

That's enough for my first post in my new  leave of absence. I actually have several posts to get to.... stay tuned!


Sunday, March 9, 2014

Spring ahead

we offer an hour
held in reserve until fall
to the gods for spring